I was so enchanted by how this little bunny turned out, I just had to share it!!
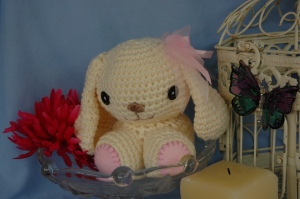
Completed Amigurumi “Beatrix Bunny”
For all those who are interested, the pattern I created is included below. You also need to note that I have used the U.S. terminology. So here goes, hope this is clear enough for everyone to follow 🙂
Yarn: 8ply (DK weight), I used a pure wool yarn in a soft cream.
Hook: 4.00mm (G/6)
NB: All components of the bunny are worked in continuous rows to avoid a seam, please mark the end of each row with a marker (I use a small safety pin).
Abbreviations:
st – stitch
sc – single crotchet
scdec – single crotchet decrease
HEAD
Row 1: 10 sc into a magic ring
Row 2: 2 sc into each st
Row 3: * sc into next st, 2 sc into next st ** repeat from * to ** until end of row
Row 4: * sc into next 2 st, 2 sc into next st ** repeat from * to ** until end of row
Row 5: * sc into next 3 st, 2 sc into next st ** repeat from * to ** until end of row
Row 6 – 14: sc in each st around
Row 15: * sc into next 3 st, scdec over next 2 st ** repeat from * to ** until end of row
Row 16: * sc into next 2 st, scdec over next 2 st ** repeat from * to ** until end of row
Row 17: * sc into next st, scdec over next 2 st ** repeat from * to ** until end of row
**TURN BALL INSIDE OUT AND STUFF FAIRLY TIGHTLY. WORK LAST 2 ROWS OVER STUFFING TO CLOSE THE BALL.
Row 18: scdec over 2 st until end of tow
Row 19: scdec over 2 st 3 times, finish off and use yarn to close the last 4 st.
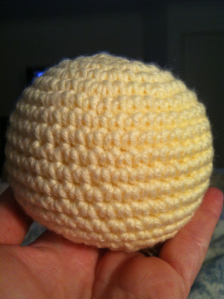
The completed head, stuffed and closed off
BODY
Row 1: 10 sc into a magic ring
Row 2: 2 sc into each st
Row 3: * sc into next st, 2 sc into next st ** repeat from * to ** until end of row
Row 4: * sc into next 2 st, 2 sc into next st ** repeat from * to ** until end of row
Row 5 – 11: sc in each st around
Row 12: * sc into next 2 st, scdec over next 2 st ** repeat from * to ** until end of row
Row 13: * sc into next st, scdec over next 2 st ** repeat from * to ** until end of row
Row 14: scdec over 2 st until end of row, finish off leaving hole open and leave a 10″ tail to attach to head.
**TURN INSIDE OUT AND STUFF FIRMLY. SIT HEAD IN OPENING OF BODY AND STITCH THE TWO BALLS TOGETHER FIRMLY.
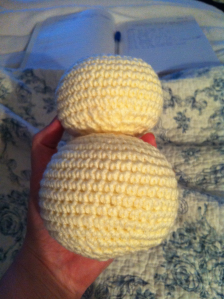
Head and Body together
FEET – (make 2)
Row 1: 8 sc into magic ring
Row 2: 2 sc into each st
Row 3: * sc into next st, 2 sc into next st ** repeat from * to ** until end of row
Row 4: sc in each st, finish off leaving hole open and leave a 6″ tail to attach to the body
**TURN INSIDE OUT AND STUFF FIRMLY. ATTACH FEET TO FRONT OF BODY FIRMLY (see first picture for placement)
EARS – (make 2)
Row 1: 10 sc into a magic ring
Row 2: 2 sc into each st
Row 3: * sc into next st, 2 sc into next st ** repeat from * to ** until end of row
Row 4 – 7: sc in each st
Row 8: * sc into next 4 st, scdec over next 2 st ** repeat from * to ** until end of row
Row 9: sc in each st
Row 10: * sc into next 3 st, scdec over next 2 st ** repeat from * to ** until end of row
Row 11: sc in each st
Row 12: * sc into next 2 st, scdec over next 2 st ** repeat from * to ** until end of row
Row 13 – 19: sc in each st
Row 20: scdec over 2 st until 4 st remain, finish off leaving a 4″ tail for attaching to the head
**TURN INSIDE OUT BUT DO NOT STUFF. ATTACH TO HEAD USING PICTURE AS A GUIDE.
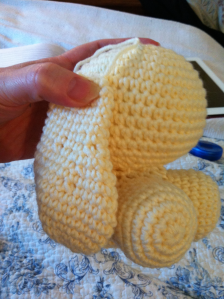
Attaching the ears for the bunny
You can basically decorate the bunny any way you wish. I have blanket stitched around two circles of pink felt and attached them to the feet. My eyes are simply black buttons, but you can use safety eyes if you like (just remember to attach them BEFORE you stuff the head), or you can use glue dot eyes (check on youtube for tutorials on how to do these, they are quite cool).
The nose and mouth are simply stitched on with embroidery cotton and then you can decorate with bows, flowers or whatever takes your fancy.
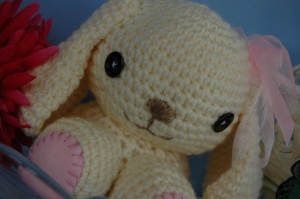
Completed amigurumi Beatrix Bunny
I hope you enjoy her as much as I did!!!
Please feel free to leave comments or if you would like clarification on any steps.
If you would like to purchase Beatrix Bunny completed, please visit my store at http://www.daisybugz.com.au
THANKS HEAPS!
